
THERMAL EXPANSION TIPS
PLATEAU UTILITY DISTRICT RECOMMENDS THE INSTALLATION OF A THERMAL EXPANSION TANK ON YOUR HOME or BUSINESS PLUMBING SYSTEM.
What Is Thermal Expansion?
…and what can I do about it?

Thermal expansion is among the more serious of plumbing concerns, but one that many homeowners know little about.
What is Thermal Expansion?
Water doesn’t compress very much at all when subjected to pressure. And when heated, it expands in volume: the contents of a 40 gallon water tank can expand by half a gallon or more when heated! Neither of these properties bode well for closed plumbing systems.
If your home has a Pressure Reducing Valve (PRV), backflow prevention valve, recirculating pump with check valve, or anything else that prevents backflow of water installed, its plumbing system is considered “closed”. Plateau Utility District exclusively uses meter yokes with an integral check valve; thus effectively all of our customers have a closed plumbing system within their homes and businesses. A closed system is one in which potable water has no way to exit a home’s plumbing (in an open system, water inside plumbing can be forced back into the city water main through the supply line).
When heated water expands in a closed system, that additional volume has nowhere to go if fixtures aren’t being used: the PRV, backflow preventer, or check valve blocks the only other path of exit. This is a very good thing should backflow from your home threaten to contaminate the water supply, but a very bad thing for fixtures, pipes and water heater if precautions aren’t taken.
The pressure added to a closed system by thermal expansion can wear out seals, damage solenoid valves (like those found on washing machines, dishwashers) and even rupture pipe. Water heaters can find their lives severely shortened thanks to the added stress. In extreme cases, increased pressure in a gas or propane powered water heater can cause the flue inside to collapse, creating a carbon monoxide leak.
Ways to Deal With Thermal Expansion
Universal Plumbing Code requires that a thermal expansion device be installed whenever a PRV or backflow prevention is present. This usually comes in the form of an expansion tank that connects to the water heater, accommodating volume increases. Other options include valves with discharge outlets that simply drain whatever the system can’t hold, and special toilet fill valves that drain excess volume into the toilet tank.
Did You Know? A dripping Temperature and Pressure Relief (T&P) Valve on the water heater is an indicator of a potential thermal expansion problem. This is the valve with the small handle or lever that automatically opens when either the temperature or pressure inside the heater tank exceed a set limit (usually 150psi/210°F). These are emergency valves, and are not meant to operate regularly. When one of them leaks, the first step is usually to replace the valve. If the leaking continues, there’s a problem.
The tried and true way to deal with thermal expansion is with expansion tanks. Installed on the supply line, these tanks feature a rubber bladder or diaphragm that separates an air chamber from the rest of the tank. Air is pumped in to match the pressure of the water supply. When water expands, instead of building pressure in the confines of the water heater or plumbing, it enters the expansion tank, compressing the air. Once expansion has stopped and there’s room, the compressed air pushes the water back into the supply.
Expansion tanks must be pressurized correctly in order to function properly. It’s always best to follow the manufacturer’s instructions, which usually call for the air pressure to match the supply pressure (you can measure this on a spigot using a water pressure gauge). If the pressure is set too low, water will too easily enter the tank, which is not designed for such regular usage. Set too high, and water has a more difficult time getting in, defeating the tank’s purpose. You can verify the tank’s pressure using a standard tire air gauge.
-
If your supply pressure is above 80 psi, most manufacturers require that a PRV be installed before the expansion tank. This is also a good idea to save your plumbing from unnecessary stress.
-
Expansion tanks usually have a 150 psi maximum pressure.
-
Expansion tanks are sized based on the water heater’s capacity and the incoming supply pressure. Be sure that you have accurate numbers for both before purchasing.
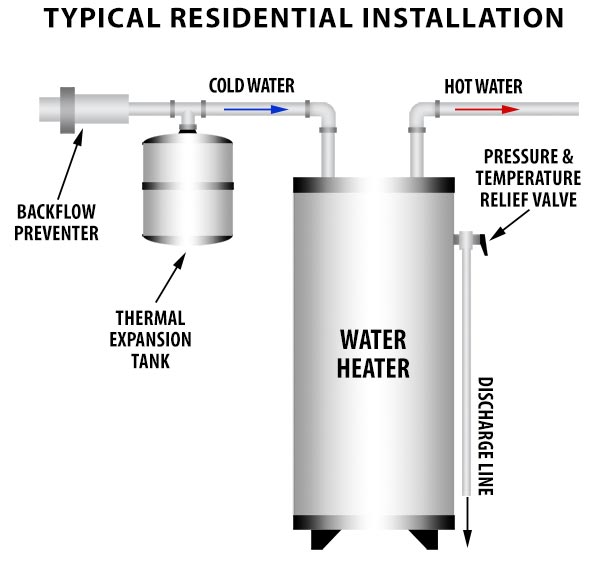
Expansion tanks should be installed on the incoming cold water supply line, before the water heater. Although many tanks can be installed in any orientation, they will perform best and last longer when installed on a horizontal run, with the tank inlet pointing down (ensuring that water makes its way in only when necessary, and drains from the tank easily).
A cursory check of the tank’s condition can be done anytime the water heater isn’t heating by tapping its exterior with knuckles or a coin: it should sound like a (mostly) hollow metal tank. If you hear more of a thud, the tank may be full of water. You can confirm a waterlogged tank by removing the cap protecting the Schrader air valve (the same kind found on car and bike tires) and pressing down on the pin. As with your tires, air should come out. If water comes out, the rubber has deteriorated and a new tank is needed. If nothing happens, the tank may not have enough air in it: use a bike pump or air compressor to re-pressurize the chamber, following manufacturer instructions.
Quick Tip: Expansion tanks should be inspected annually. Once installed, the only way to get an accurate reading on the expansion tank’s air pressure is to shut off the water supply and relieve system pressure by opening a faucet before measuring. Since your water heater should also be on an annual maintenance routine, it makes sense to deal with both at the same time.
If you already have an expansion tank installed, great! If you don’t know whether your plumbing system is open or closed, find out! While your home may have a device regulating water pressure, or safeguards against contaminating the water supply, it still may be vulnerable to the damaging pressure of thermally-expanded water.
WATER LEAKS HELPFUL TIPS
- Repair all leaks as soon as possible;
- After all leaks have been repaired, you may be eligible for bill adjustment through our Servline Insurance Program;
- For more information about billing adjustments, call Customer Service at (423) 346-3101 or Servline at (844) 748-2437.
HAVE A HIGH WATER BILL?……HERE’S WHAT TO DO!
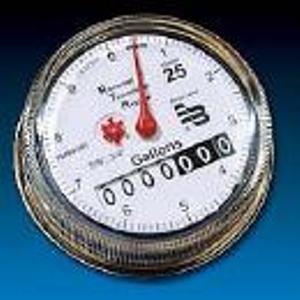
- Locate your water meter. It is normally found at the property line in the front yard near the end
- of your drive way.
- Be sure that no one is using water. Read and record your meter reading.
- There is a hand that looks somewhat like a second hand on a watch . Note its position. Observe the position of this hand for 2 to 3 minutes. If it moves, there is a leak.
- There may also be a small triangle or a star shaped device on the dial (look to the left of the illustration at the top). If it is moving, water is leaking.
- You may have a water cut-off valve inside your house. If so, close the valve. If the meter is still moving, your leak is between the meter and the valve location. Look for wet spots in the yard. This type of leak is often difficult to locate, so you may need to call your local plumber.
- If the meter flow indicator hand stops when the cut-off valve is closed, the leak is in the house beyond the cut-off valve. Turn the valve back on and check under the house for leaks.
- Check the water level in the commode. It should be at least 1/2 inch below the top of the overflow tube. Plateau Utility District has dye tabs in the office that you can place in the back of the tank. If you see any color in the bowl after about 15 minutes, the seal is not sealing good. These tabs are free.
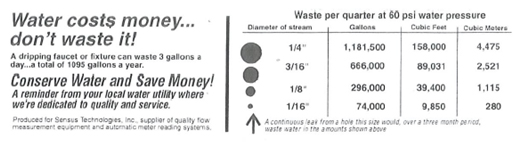
- Some leaks are very small. A leak that runs 24 hours a day will add up to a large water bill.
- To determine the size of a leak, read your meter before you leave for work or before going to bed—any long period of time when there will be no water usage. (Be sure that icemakers and any other type of automatic water devices are turned off). After several hours, read the meter again. Subtract the difference. This number represents the size of the leak.
Have a leak repaired quickly!
You may be responsible for all the water that goes through your meter.